CRM: CRM Configuration: Pipelines
Purpose
The purpose of this documentation is to go over the CRM Pipeline settings in Odoo 13.
Important!
You'll need to enter Debug Mode for some of the steps in this document.
Process
To get started, navigate to the CRM application.

Stages
Stages are displayed as columns in the CRM and are used to organize every step of the sales funnel.
Editing a Stage
From your pipeline, mouse over a Stage name and a Configuration icon will appear. Click the icon to unfold a menu and from there, click Edit Stage.
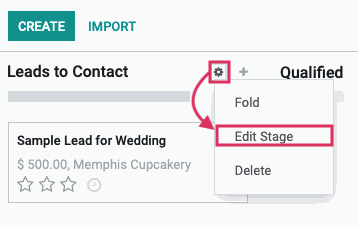
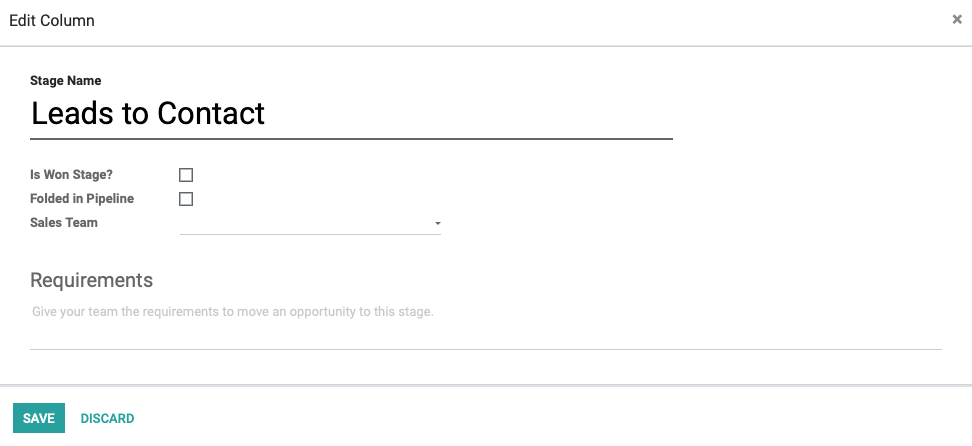
This will bring up a modal window allowing you to edit the details of this stage. Please move on to the next section, Creating a Stage, to review what each field represents.
Creating a Stage
To create a Stage, go to CONFIGURATION > PIPELINE > STAGES. This menu item will only show in debug mode. Once there, click Create. This will bring up a modal window allowing you to add details to this stage using the following field:
Stage Name: Enter the name for the stage.
Is Won Stage: If this stage indicates the Opportunity has been Won, then check this box. This is generally the last stage of the pipeline.
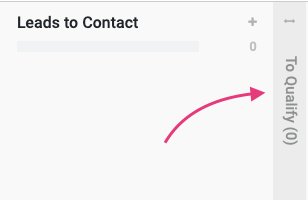
Folded in Pipeline: This indicates if the column should be folded, or have its content hidden, in the pipeline. This can be use to improve the presentation of your pipeline. The following is a folded stage. It can be unfolded by clicking the icon.
Sales Team: If this stage should be restricted to one Sales Team, select that team here. If a stage is assigned to a team, it will not be visible to other teams.
Requirements: Enter notes for internal use indicating anything important about this stage.
When you're ready, click save.
Good to Know!
It may be tempting to add several Stages, but try to keep the number of Stages to a minumum. There are other ways to manage the workflow that don't involve stages, such as tags and activities.
Tags
Tags allow us to further organize without adding an entire stage. They can be color-coded making them easy to see at-a-glance in kanban view. They're also useful for filtering and fine-tuning reports.
Creating Tags
Go to CONFIGURATION > PIPELINE > TAGS. Here you'll see an existing list of tags used solely for the CRM app.
From this page you can click Create to open a new line and add a new tag.
Tag Name: This should be a short name for easy reference. Remember, it will be displayed in a very small space.
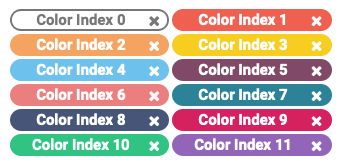
Color Index: Odoo uses a color index to assign colors by number, shown below.

When you're done, click Save.
Good to Know!
Tags "On the Fly"
The following is the new Lead form in CRM. In this, and many other apps, you can create tags directly from the form. To do this, simply type into the Tags field and select Create "Tag Name" from the drop-down menu.

This will immediately convert into a tag that you can then click and select a color for.
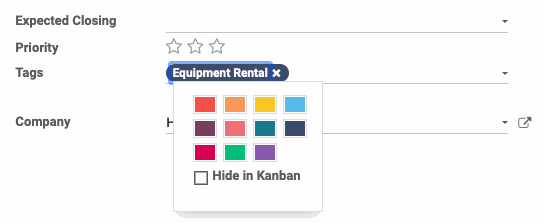
Hide in Kanban will remove the color from the tag and hide it in kanban view. The tag can still be used for filtering and reporting, but will not display on the kanban cards.
Lost Reasons
Lost reasons provide a way to categorize opportunities that didn't convert to sales. Having them in this predefined list allows you to have cleaner reporting, and saves time when managing your pipeline.
Create a Lost Reason
Go to CONFIGURATION > PIPELINE > lost reasons. Click Create and a new line will open up for you. Enter a description, then click Save.
