Odoo Connectors: Connector Configuration
Repository Versions:
Purpose
This documentation outlines the processes associated with one of Hibou's Connector modules. A connector allows you to synchronize your products, pickings and sale orders between a third party program and your Odoo database.
Getting Started
First things first, we need to install the module! Navigate to the Apps app.

Once there, remove the Apps filter and and search for the connector you'd like to use and click Install.

Good to Know!
Most module requires the Invoicing, Products & Pricelists, Delivery Costs, Sales and Warehouse Management, and Connector for E-Commerce modules. However, if you do not already have these modules installed, Odoo will install them for you during this module's installation.
All `connector` modules require a significant number of OCA modules as well as python packages. For the easiest time, use the bundled/linked versions of all of the libraries found in this repository and Hibou's maintained Docker Images.
Editing Configuration Files
Configuration Files: Your Odoo configuration (typically at /etc/odoo/odoo.conf ) will need a couple of things to function properly.
Add `queue_job` as a server wide module like so
server_wide_modules = web,dbfilter_from_header,queue_job
Configure the number of queue workers by appending a section like this to the end of your file.
[queue_job]
channels = root:1,root.magento:1,root.opencart:1, root.walmart:1
Important!
Make sure that you restart your Odoo installation after getting all of the requirements and configuration in order.
Gathering API Credentials
Hibou will have several discussions with you leading to this point in the connector process, but generally speaking, API access to the third party will be required. An API (Application Programming Interface) compiles data to a table that Odoo can access and interpret to gather the relevant order information.
Some third parties will have unique requirements surrounding the amount of data pulled and returned via the connector. Some of the more established third parties will have an API user interface that requires registration and the use of test/production credentials.
If your third party requires registration, complete the set-up and gather this information for use in the connector. You will be granted API keys when it is complete.
Process
Navigate to the Connectors app.

Creating a Backend
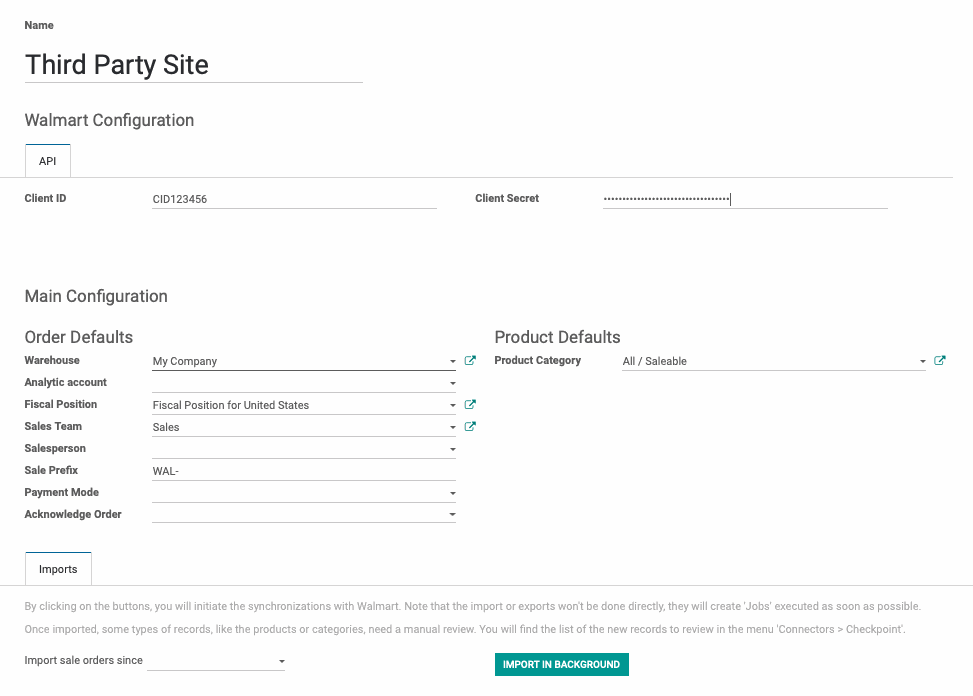
Once there, go to {your Connector} > Backends. Click Create to start a new Backend. Backends are essentially channels that the imported orders flow through to assess and match data.
Here's an example of the Walmart connector:

Good to Know!
All Connectors are Different
The fields on each connector will vary from one to the next because their APIs both require and provide different information. See documentation for each specific connector for more guidance.
Configuration
Once the new record is opened, you will need the following data:
Name: Name your backend.
Each connector will request account-specific connection details under the API tab. Our example shows both Client ID and Client Secret.
Connectors may also request the following, and these fields may be under separate tab(s):
Warehouse: Select the warehouse the products will be delivered from.
Analytic Account: If desired, set an analytic account to track order data for reporting.
Fiscal Position: If the taxes are collected prior to import, create and set an appropriate fiscal position.
Sales Team: If desired, set a salesteam to track order data for reporting.
SalePrefix: Set the prefix for the order number as it is imported for grouping/filtering purposes.
Product Category: If there is not a matching product in your Odoo database, the connector will create a new one. Set the desired category for the new product record here.
Import Options
Connectors give you the option to only import a select number of records based on the last order ID or a specific date, depending on the connector. In our example, this setting is under the Imports tab.
Click Save.
You are ready to import orders. Note that orders will not be imported directly, as they will have to be compared against Odoo's record requirements using the information stored in this backend record. Instead, orders will appear in the Job Queue, which can be configured to flag a variety of exceptions such as incorrect tax data or fields that don't meet the parameters set. Incomplete or missing phone numbers, zip codes, etc. are good examples of order data that will be flagged in the job queue for resolution.