CRM: CRM Configuration: Sales Teams
Purpose
The purpose of this document is to walk you through the steps needed to create Sales Teams in Odoo's CRM application. Sales Teams enable you to easily organize, manage, and assign sales opportunities to specific members of your sales organization. Sales Teams are used to track your sales agents by location, region covered, or if you want to assign agents to a specific sales goal (events, for example) at any time.
Processes
To get started, open the CRM application.

Configuring Your Sales Team
Once you open the CRM application, click Configuration from the top navigation menu, then select Sales Teams
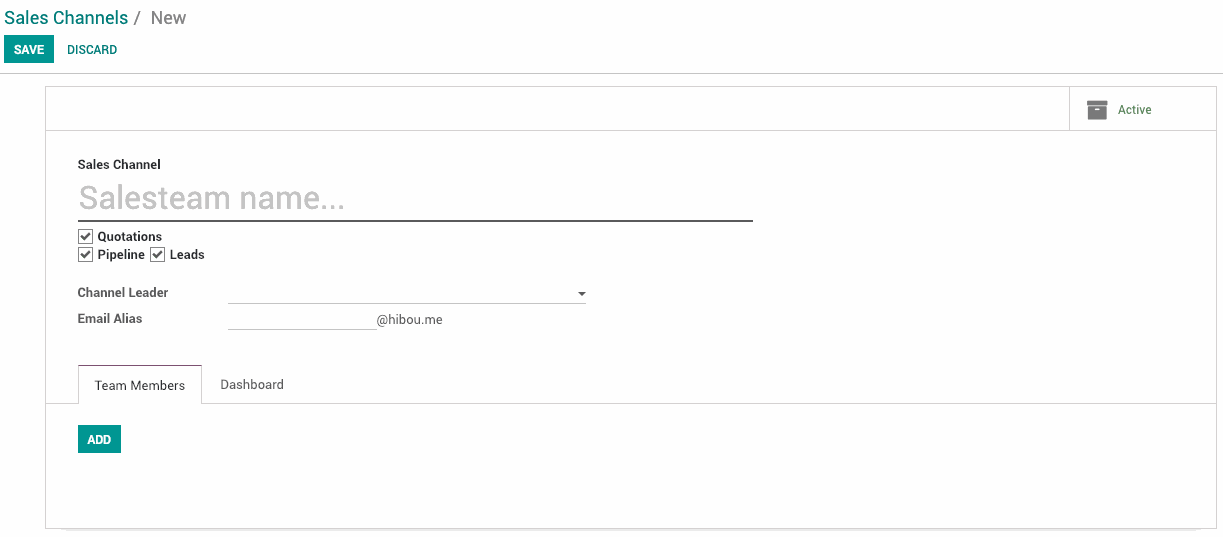
On the next screen, select create and you will see a screen like the one below:

Good to Know!
If you don't see the option for "Leads" underneath your Sales Team's Name, this means that you need to activate the "Leads" feature in your settings.
Go to CONFIGURATION SETTINGS in the top menu. On the Settings page, activate "Leads" and click Save. Now, you'll have the option to manage Leads in your CRM application.
Salesteam name: This is what you want your Sales Team to be called or referenced by within your CRM application. You can break this down by region covered, office location, or any other organization method you choose.
Quotations: Selecting this option will add the ability for your team to create new quotes from the Sales > Team Pipelines page under the Menu for that Sales Team.
Pipeline: This should be left selected if you want to use the Pipeline data for your Sales Channel's reports. You set this parameter on the Dashboard tab which we discuss in more detail below.
Leads: Selecting this option will allow you to pre-qualify leads that get routed into your system. For more information on managing leads and opportunities, please refer to the Managing Your CRM Pipeline documentation.
Team Leader: This is the sales agent or manager that is in charge of this Sales Team.
Email Alias: If you create an email alias, then any emails sent to that address will create an opportunity/lead and add it to your pipeline for your Sales Team to follow up with.
Adding Team Members
Once you have the above details filled in, you need to assign Team Members to the Sales Team. Click the ADD button underneath the Team Members tab to assign your sales agents to this team.

The next step is the Dashboard tab to the right of the Team Members tab we were just looking at. Everything under the Dashboard section customizes how your Sales Team's progress will be displayed on the Sales > Team Pipelines page.
When you click on the Dashboard tab, you will see the following options:
Invoicing Target: This is the target gross invoice amount that this Sales Team should be invoicing clients on a monthly basis.
Graph: This has several options underneath it that will effect the report that gets displayed for this Sales Team.
Content: Allows you to control what the report for this Sales Team is displaying; you can choose from the progress on the team's Pipeline, the number of Sales closed, or the gross Invoice amount.
Expected to Close: Allows you to set the timeframe that the report will pull the data from based on when your sales people have set the expected Close dates on their Opportunities.
Grouping Method: Allows you to select how you want the data to be grouped in your report.

Once you have all of your options configured for your Sales Team, the only thing left to do is click SAVE at the top left. This will save your Sales Team in your CRM application so you can start assigning this Sales Team Leads and Opportunities.
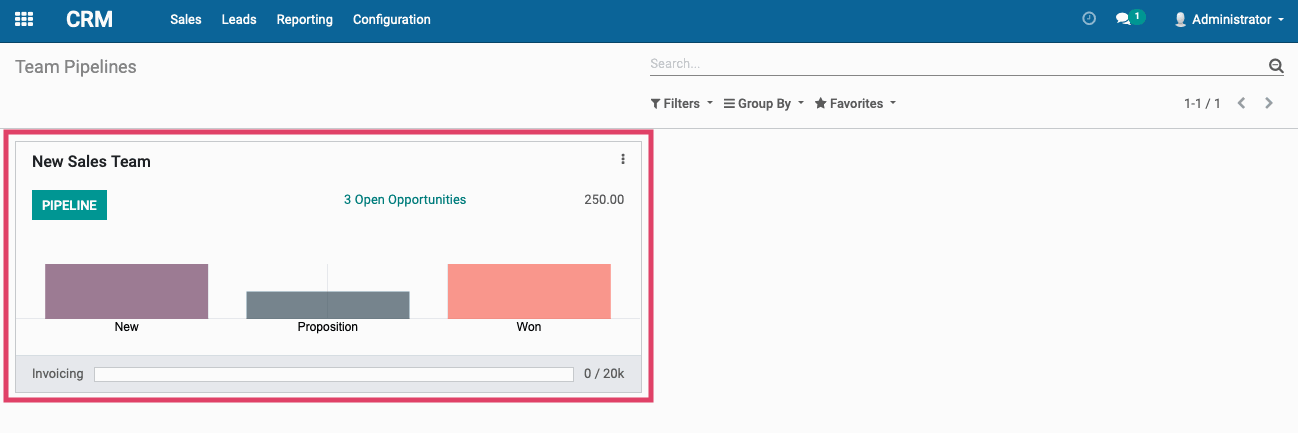
As you can see in the above screenshot, under our Dashboard tab we've set an Invoicing Target of 20,000, from the Graph options we've selected that we want to see everything in our Pipeline that's Expected to Close Within a Month and Grouped by its Stage in the Pipeline. Here's how that report looks when we view our Sales Team's report from the SALES TEAM PIPELINES page.
