Accounting: Accounting: Journal Entries
Purpose
The purpose of this documentation is to outline the processes associated with Journal Entries in Odoo 15.
A Journal Entry, also referred to as an accounting entry, is a formal record that documents a transaction in a Journal. In Odoo, journal entries are made by utilizing the double entry bookkeeping system.
Double Entry Bookkeeping Systems require you to make at least one debit line and at least one credit line for each entry. In addition, the totals of the credit side and the debit side of an entry must be of equal value.
In Odoo, these credit and debit lines that make up Journal Entries are called Journal Items.
Processes
To get started, navigate to the Accounting application.

Creating a Journal Entry Manually
In Odoo, there are numerous operations that can lead to the creation of a journal entry, such as customer invoices, payments, vendor bills, bank statements, stock moves, payslips, etc. However, sometimes it is necessary to create journal entries manually, like when setting up your initial account balances or recording an adjusting journal entry.
To get to your Journal Entries, click Accounting > Journal Entries. You will see a list view of journal entries, typically filtered to show only those related to the 'Miscellaneous' journal.
Click the Create button to open a form view and begin a new entry.

On the next screen, you will be prompted to fill in the following fields:
Draft or Number: This segment identifier pre-fills automatically based on the 'Short Code' set on the selected journal, the year of the accounting date, the month of the accounting date, and the next available record number for that period in that journal.
Reference: Enter a description of the journal entry's purpose; this will appear on the journal entry itself.
Accounting Date: This is the date that you want the entry to be shown as being done on. It is automatically set to the current date, but should be changed, as appropriate.
Journal: Select the journal to which you'd like to add this entry. All journal entries require a journal to be selected.

In the Journal Items tab you will add Journal Item lines. You will always need a minimum of two lines, at least one for debit amounts and at least one for credit amounts.
Click the Add a line button to add a journal item line.
You will be prompted to fill in the following information:
Account: Select the account from which you will be making the debit/credit from the drop down menu. This is required for all Journal Items.
Partner: Select any associated partners for this Journal Line, if applicable.
Label: Input a description of the debit/credit line for internal reference.
Analytic Account: Choose a relevant Analytic Account, if desired.
Analytic Tags: Choose a relevant Analytic Tag, if desired.
Debit: The value of the debit. (Skip if this line is for a credit entry.)
Credit: The value of the credit. (Skip if this line is for a debit entry.)
Continue adding as many journal items as needed. When finished, make sure that the totals of the Debit and Credit amounts are equal. When ready, hit the Save button.

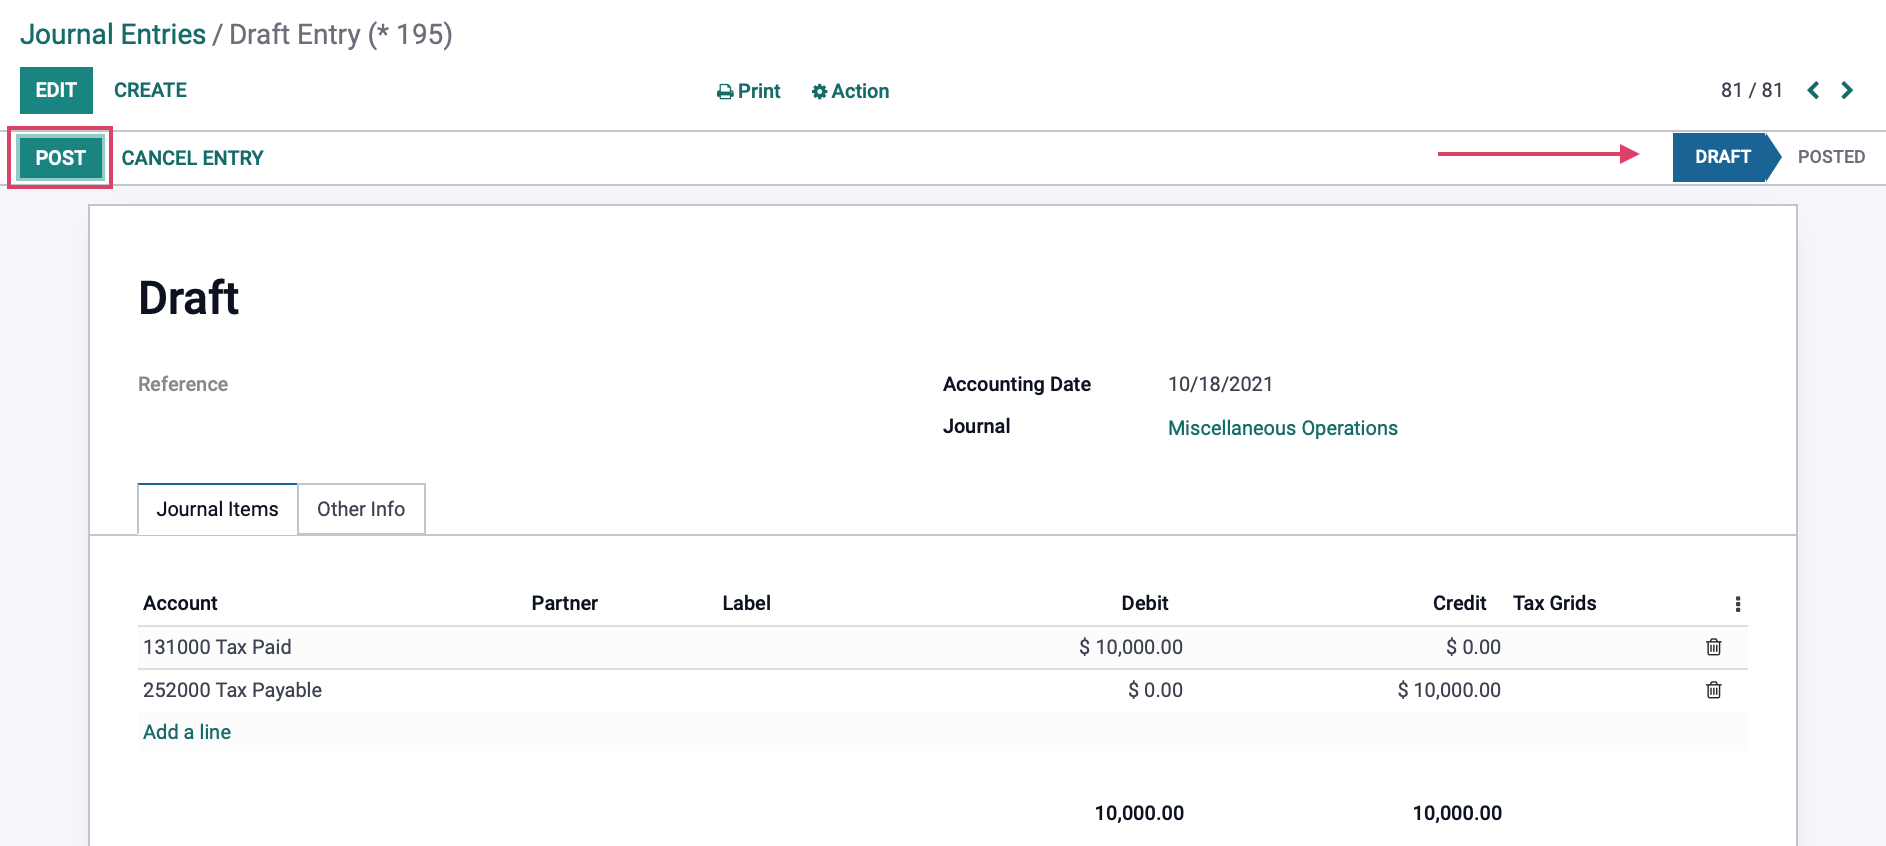
You will notice that the entry has not yet been posted, and is in the Draft (or unposted) state. This adds another step of validation before actually posting the entry to your journal and gives you time to ensure that everything has been entered correctly.
When the entry is complete and correct, click the Post button to commit the entry and change the status to Posted.
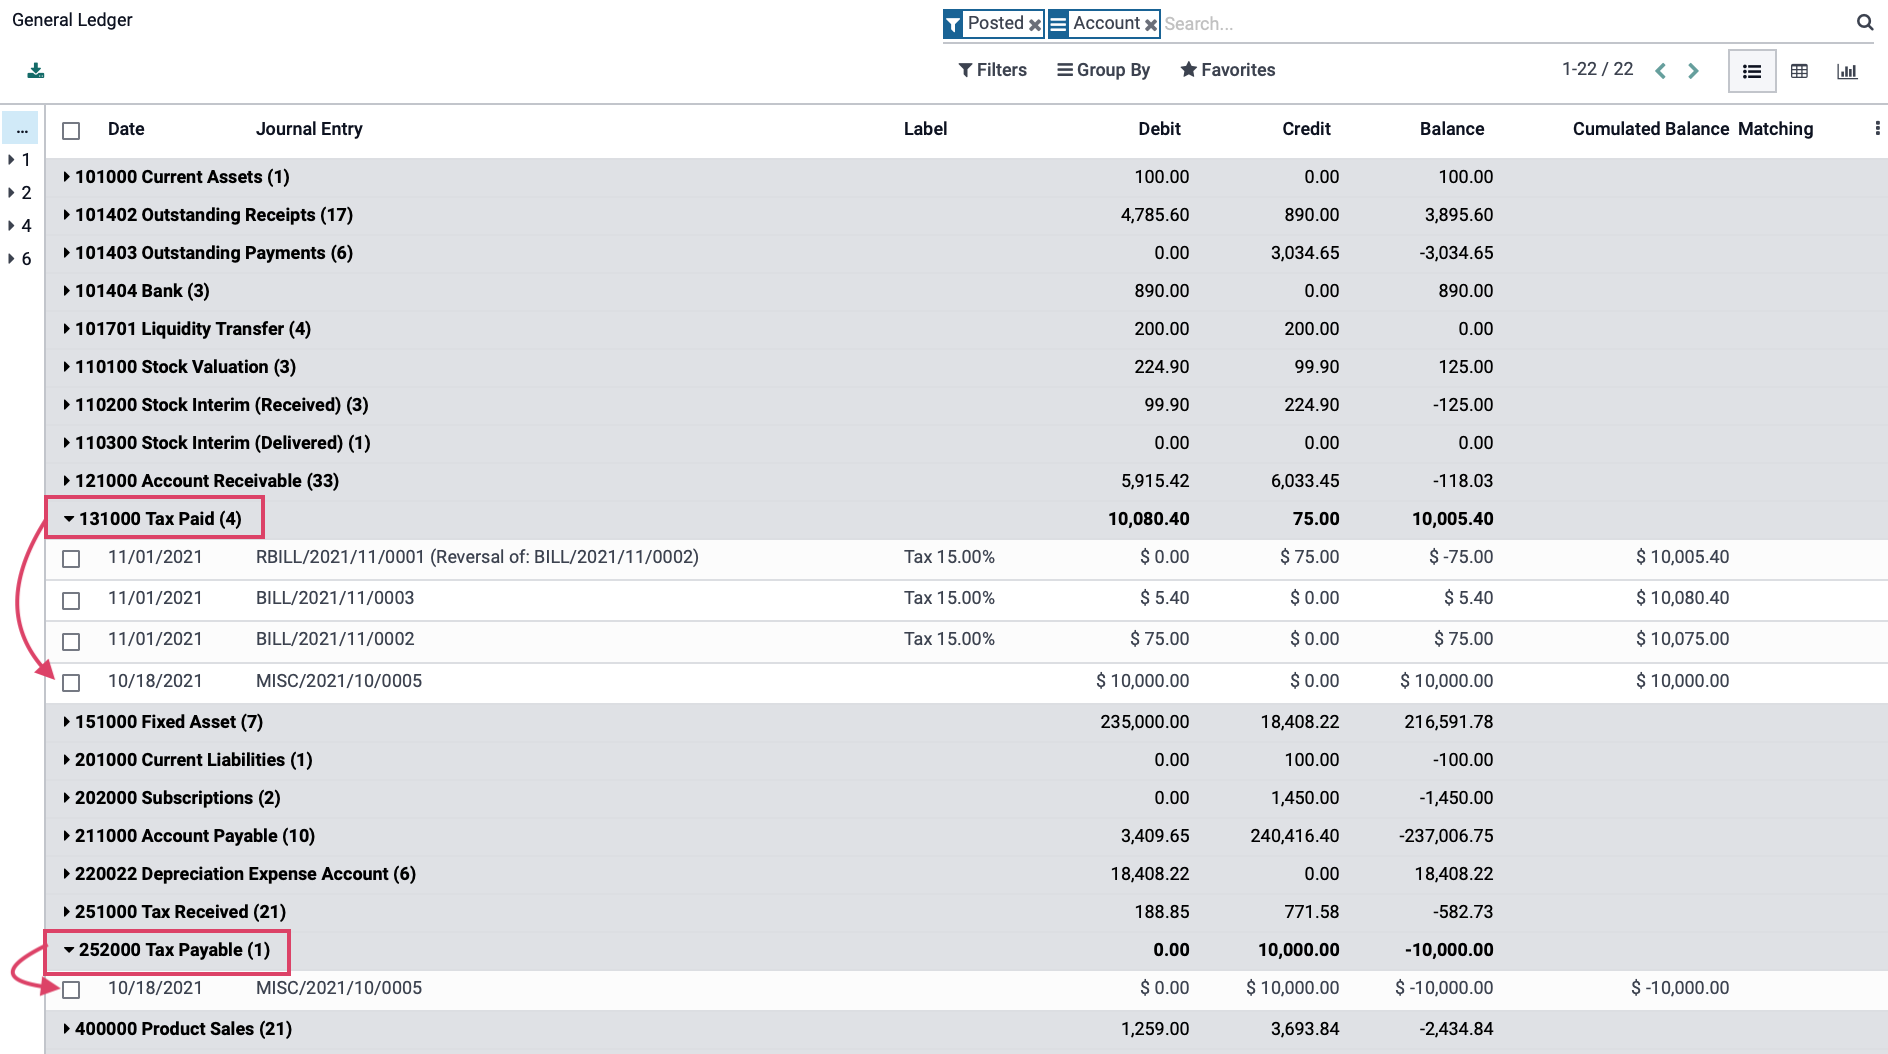
Once your Journal Entry has been posted, it will be included by default in the accounting and financial reports such as the General Ledger report. Go to ACCOUNTING>LEDGERS>GENERAL LEDGER (Note: There are options when running the reports to include unposted entries as well.)
Reversing a Journal Entry
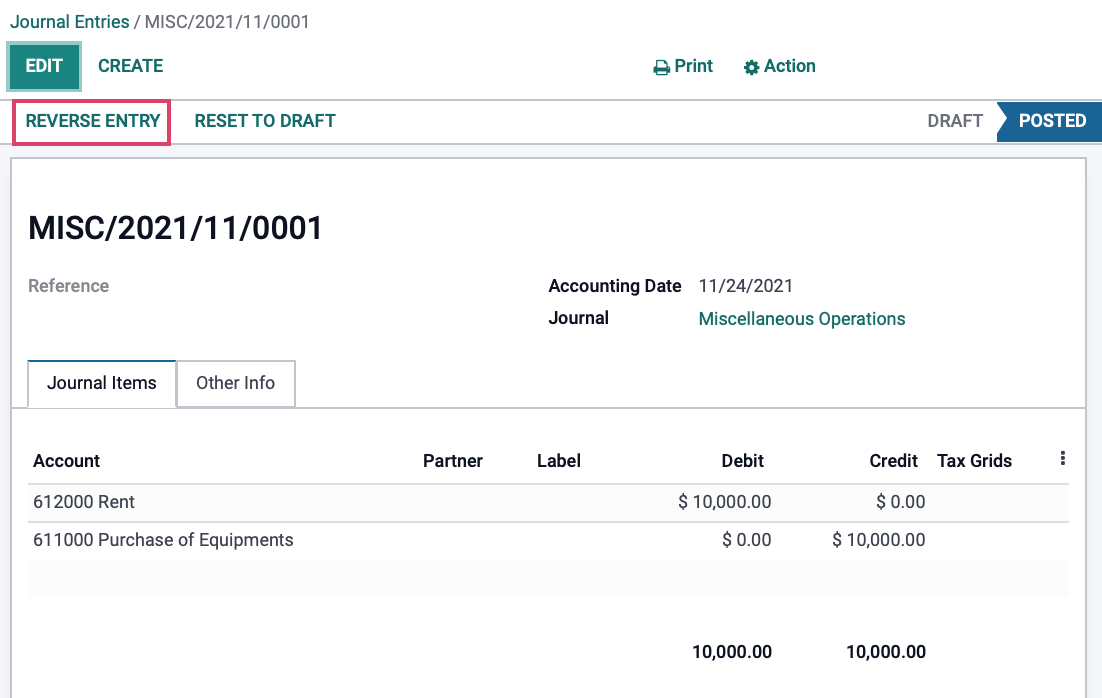
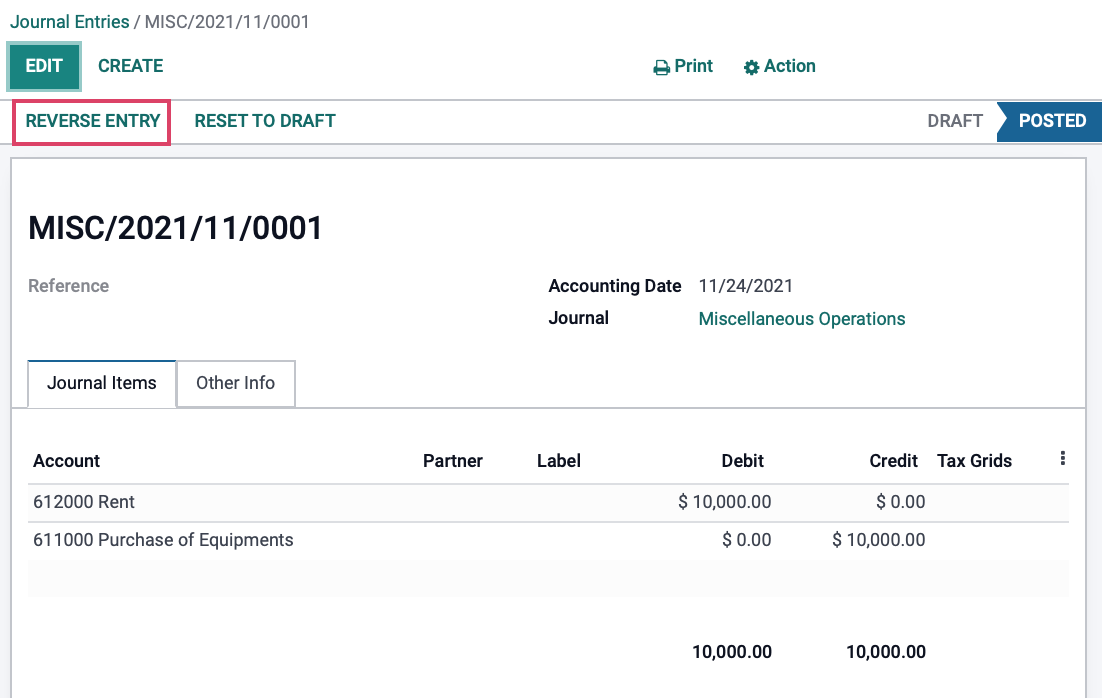
Navigate to the journal entry you wish to reverse. Once you're on the journal entry, click Reverse Entry.
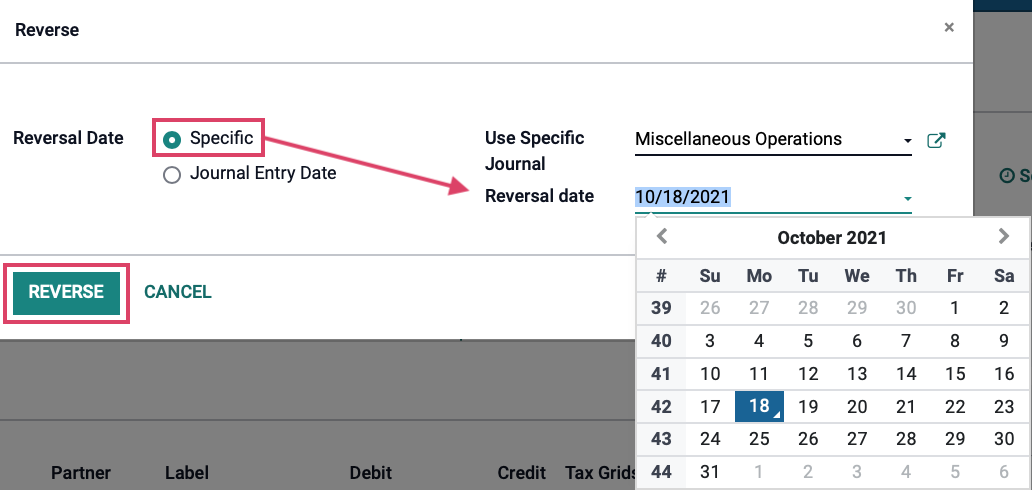
A Reverse Moves modal will appear and you will give you the option to fill in the below:
Reversal Date: Select between the options of Specific or Journal Entry Date for the date you want the reversal entry to Post.
Specific: This option allows you to set the date of the reversing entry to any open accounting period. It will be set to the current date by default, but should be changed as needed.
Journal Entry Date: This option will use the original date of the entry to post the reversing entry.
Use Specific Journal: If you would like to use a specific journal to record the reversal that is different from the Journal this entry was originally posted to, you can select an alternate journal from this dropdown. If this field is left blank, it will use the Journal the entry was originally posted to.
When ready, hit the REVERSE button.
Once reversed, you will see the entry that has been created in the system. Notice that this entry is already Posted, and Journal Items are the similar to the original journal entry with the exception that the debit and credit amounts are swapped. The Reference will also indicate that this journal entry is a reversal of the original.
Navigate back to the list of Journal Entries (or a financial report) to view the results.
