- Stock Delivery Planner
- ShipBox
- PrintBox
- Boxes
- US ZIP Code to City/State
- Point of Sale Modules
- Purchase by Sale History MRP
- Payroll Batch Work Entry Error SKIP
- Web Auto Paginate
- Website Modules
- Hibou Fedex Shipping
- Hibou Commissions
- Sale Section Subtotal
- Forte Payment Acquirer
- Helpdesk Modules
- Account Payment Electronic
- Tools + Settings Modules
- Sales Modules
- Inventory Modules
- Accounting Modules
- Manufacturing Modules
- Purchase Modules
- Project Modules
- Payment Analytic
- Payroll Modules
- Human Resources (HR) Modules
- HR Holidays Partial
- Payroll Input Name Report
- HR Payroll Input Report
- HR Holidays Accrual
- Maintenance Modules
- HR Employee Activity
Hibou Odoo Suite: Accounting Modules: Forte Payment Acquirer
Repository Versions:
Purpose
This documentation covers the installation, configuration, and functionality of Hibou's Forte Payment Acquirer module for Odoo.
Getting Started
The first step is to install the module. To do so, navigate to the Apps application..

Once there, remove the 'Apps' filter, then search for 'Forte Payment Acquirer'. When you're ready, click install.
Good to Know!
The Forte Payment Acquirer module requires the Payment Acquirer application. However, if you do not already have this application installed, Odoo will install it for you during this module's installation.
Process
To get started, navigate to the Accounting app.

Once there, go to Configuration > Payments > Payment Acquirers. Here you'll see that Forte has been added to the options.
To enable Forte, click Activate.

This opens the configuration page with the following fields:
Name: This is pre-populated with 'Forte'.
Provider: This is pre-populated with 'Forte'.
Under the Credentials tab, enter the values provided to you by Forte.

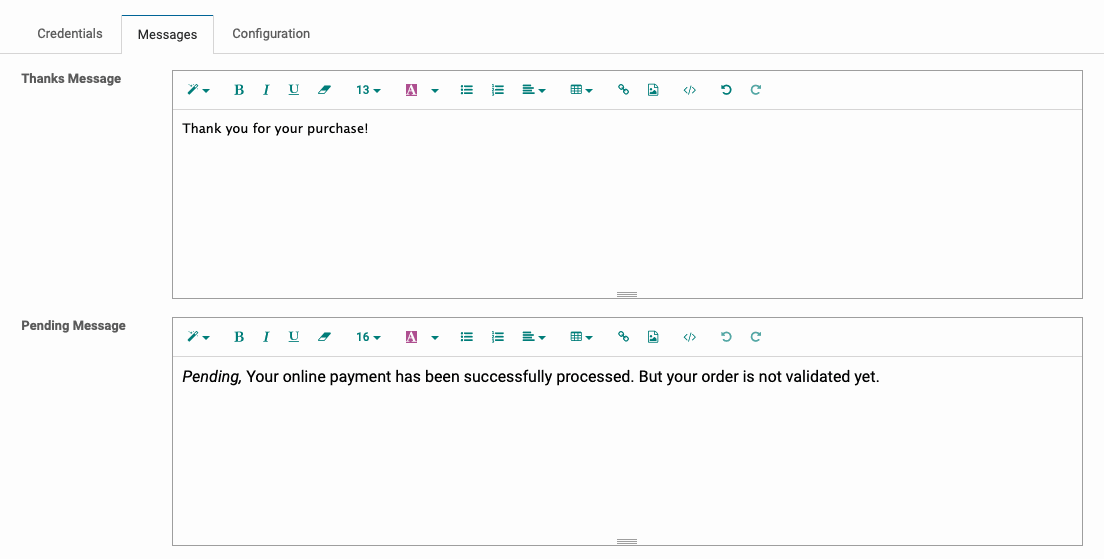
Under the Messages tab, enter the text that will display to your customers at different phases of the transaction:
Thanks Message
Pending Message
Done Message
Cancel Message
Error Message

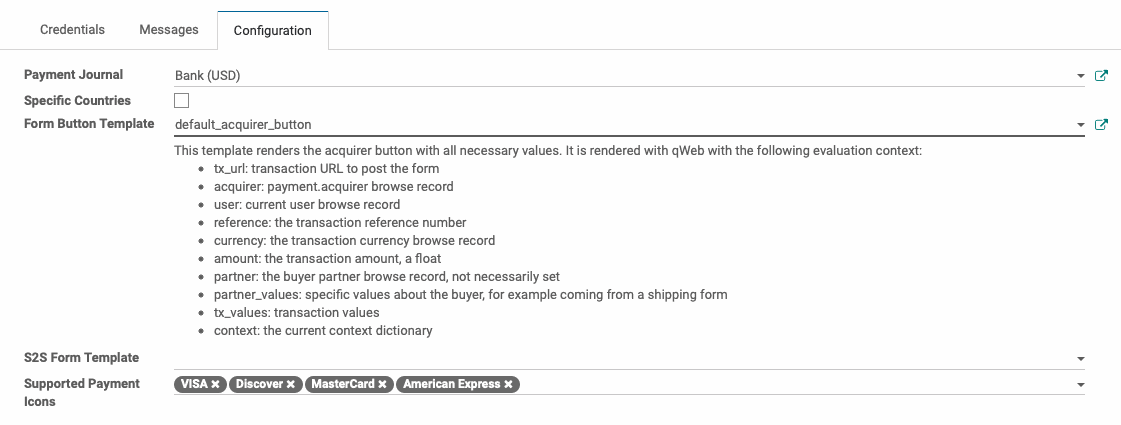
Under the Configuration tab:
Payment Journal: Select the journal to record transactions that use this acquirer.
Specific Countries: To allow this payment method is specific countries, check this box then select the countries that apply. If left unchecked, the payment method will be available to all countries.
Form Button Template: If desired, you can change the form button template. The default setting is 'default_acquirer_button'. This template renders the acquirer button with all necessary values. It is rendered with qWeb with the following evaluation context:
tx_url: transaction URL to post the form
acquirer: payment.acquirer browse record
user: current user browse record
reference: the transaction reference number
currency: the transaction currency browse record
amount: the transaction amount, a float
partner: the buyer partner browse record, not necessarily set
partner_values: specific values about the buyer, for example coming from a shipping form
tx_values: transaction values
context: the current context dictionary
S2S Form Template: Select a template for method registration as instructed by Forte. Note that you can start by duplicating the `default_acquirer_button` and making modifications.
Supported Payment Icons: Select all credit cards accepted with this payment method.

When you're done, click Save.