- Stock Delivery Planner
- ShipBox
- PrintBox
- Boxes
- US ZIP Code to City/State
- Point of Sale Modules
- Purchase by Sale History MRP
- Payroll Batch Work Entry Error SKIP
- Web Auto Paginate
- Website Modules
- Hibou Fedex Shipping
- Hibou Commissions
- Sale Section Subtotal
- Forte Payment Acquirer
- Helpdesk Modules
- Account Payment Electronic
- Tools + Settings Modules
- Sales Modules
- Inventory Modules
- Accounting Modules
- Manufacturing Modules
- Purchase Modules
- Project Modules
- Payment Analytic
- Payroll Modules
- Human Resources (HR) Modules
- HR Holidays Partial
- Payroll Input Name Report
- HR Payroll Input Report
- HR Holidays Accrual
- Maintenance Modules
- HR Employee Activity
Hibou Odoo Suite: Return Merchandise Authorization (RMA): Return Merchandise Authorization (RMA): Templates
Purpose
This documentation outlines the use cases and processes associated with creating Return Merchandise Authorization (RMA) templates within Hibou's RMA application. Additional configuration options are available when Hibou's RMAs for Sale Orders module is also installed.
Due to the template-driven nature of Hibou RMAs, there are a high number of configuration options available which results in a highly flexible system. If you do not use the Sales application, RMAs can still be used in conjunction with the Inventory application to manage the appropriate inventory moves.
Process
To get started, navigate to the RMA application.
Creating RMA Templates
Once there, go to Configuration > Templates.
Here you will see a list of all of your RMA templates. To add a new template, click NEW.
Good to Know!
RMA Templates are Flexible!
You can mix and match when setting up an RMA template: Use only inbound, only outbound, or a combination of both! This provides an immense amount of flexibility that can meet most RMA use cases.
Template Name: Give your RMA a name that is descriptive and tells users at a glance what operations are associated with the template or the template's use case.
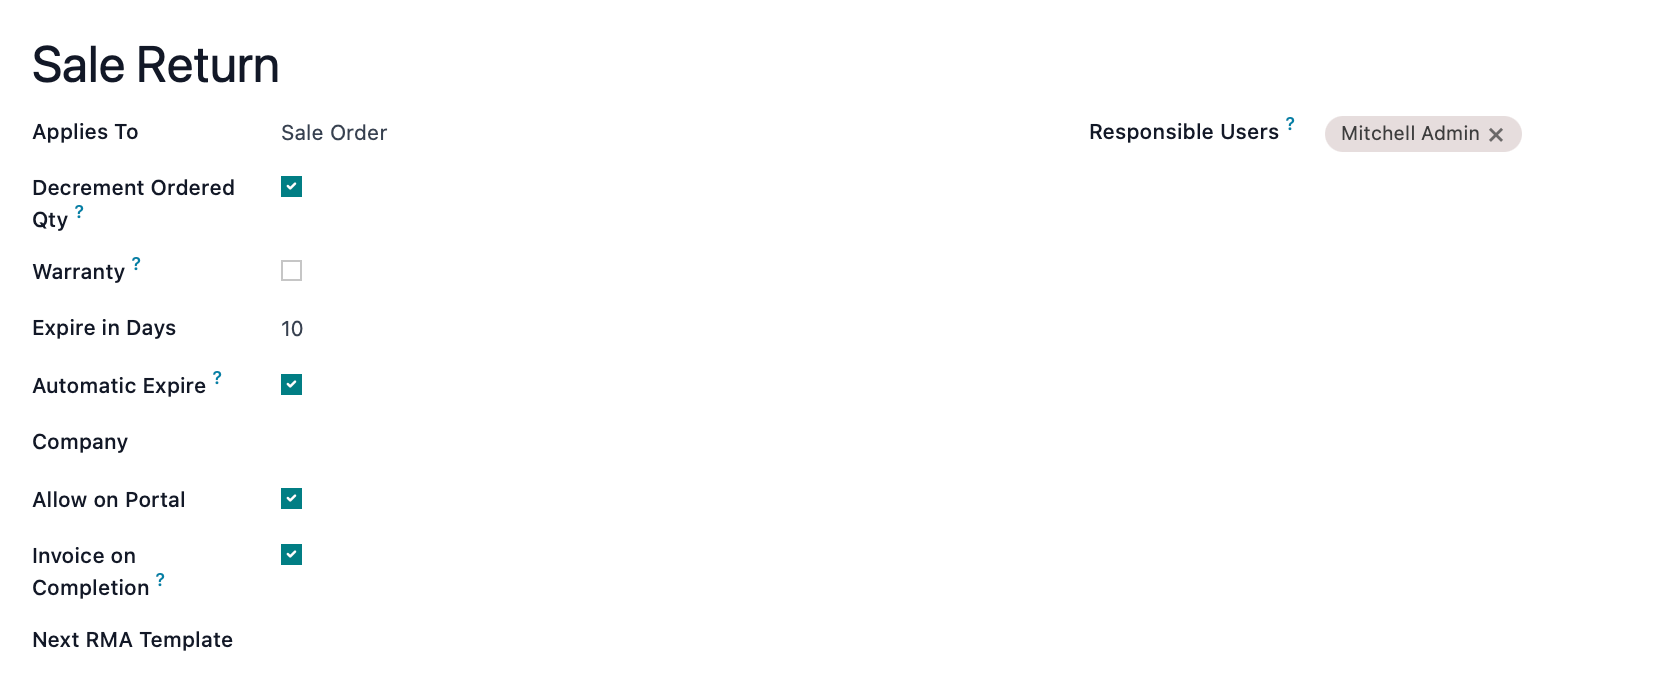
Applies To: Select the type of operation this template should apply to. Stock Picking will be the only option unless the module Hibou RMAs for Sale Orders is also installed.This will be selectable by your customer service team, as well as customers in the portal (if enabled). When Sale Order is selected, you'll see the following fields:
Decrement Ordered Qty: Enable this if you'd like to decrease the ordered quantity on the related Sale Order by the same amount that was returned. The primary use for this field is to provide the most accurate data for reporting purposes. For example, if you're using the Ordered Quantities to inform your purchasing behavior, or you've built a report to show the difference between Ordered and Delivered quantities to show what needs to be backordered or is pending fulfillment.
Warranty: Enable if the template purpose is warranty return.This allows you to set a return-eligible period for a product.
Expire in Days: Enter the number in days from the date the RMA is requested the customer must take action before it expires. If no pickings are created within the required number of days, the RMA will be moved to the Expired state.
Automatic Expire: If no pickings are created within the required number of days, the RMA will be moved to the Expired state automatically.
Company: If you're in a multi-company environment, select the company that owns this RMA template.
Allow on Portal: Enable this to allow customers to initiate an RMA through the customer portal.
Invoice on Completion: Enable this to generate an invoice when the RMA is marked as Done. The invoice will appear on the completed RMA.
Next RMA Template: If applicable, select an RMA Template to trigger upon the completion of this template.
Responsible User: Select one or more users to have an activity created for them when a new RMA is created. This is useful when you allow RMAs to be created from the portal as it allows approval or denial of each request.

Creating Inbound Pickings
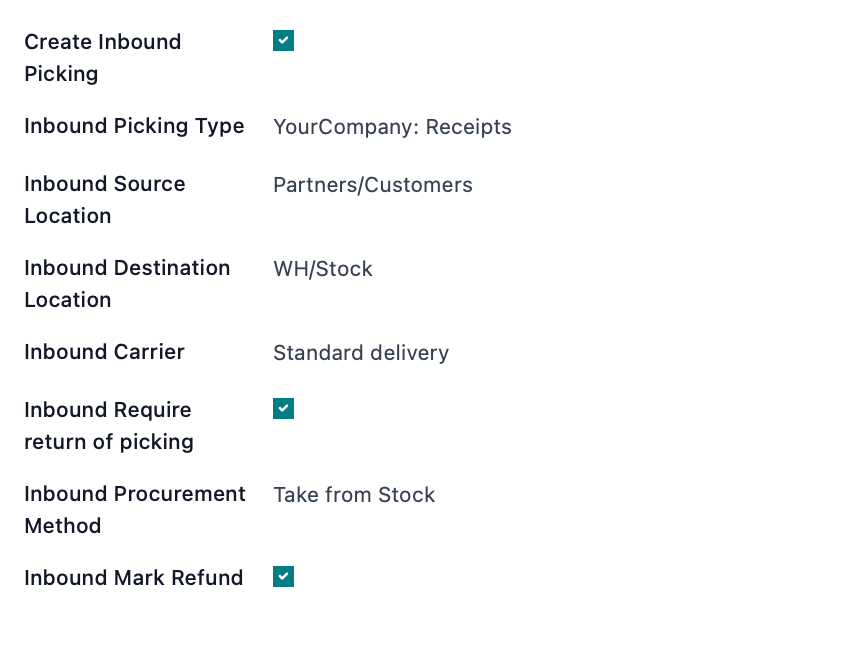
The purpose of the Inbound Picking is to receive product from the customer. To create an inbound picking for merchandise, check the "Create Inbound Picking" checkbox and use the following configuration options:
Inbound Picking Type: This will typically be the Receipts operation type for a given warehouse.
Inbound Source Location: The location the product is coming from.
For sale order RMAs, this will typically be the 'Partner Locations/Customer' location.
For stock picking RMAs:
If used to return a picking that went to a customer, this will typically be the 'Partner Locations/Customer' location.
If used to receive replacement goods on a picking from a vendor, this will typically be the 'Partner Locations/Vendors' location.
Inbound Destination Location: The location the product is going to.
For sale order RMAs, this will typically be a given warehouse's Returns location, so the merchandise can be evaluated before being scrapped or made available again as sellable stock.
For stock picking RMAs:
If used to return a picking that went to a customer, this will typically be a given warehouse's Returns location.
If used to receive replacement goods on a picking from a vendor, this will typically be a given warehouse's main Stock location.
Inbound Carrier: You can set a default carrier that, with configuration, allows for sending printable, PDF labels to customers for returns in which the company covers return postage. This is Carrier and integration dependent.
- Inbound Require Return Picking: When checked, this will find a picking that's eligible to return. In a stock picking RMA, the eligible picking will be the picking that was selected from the drop-down menu. When unchecked, it will make a new picking. In most cases this should be checked as it is the mechanism that links the picking line back to the line on the related Sales Order, which is responsible for decrementing the delivered , which is responsible for decrementing the delivered quantity.
Inbound Procurement Method: Select the procurement method for the inbound picking. 'Take from Stock' will take from stock, while 'Apply Procurements' will be based on your company's particular procurement configuration.
Inbound Mark Refund: This will increment or decrement quantities on the documents associated with the return. Note that this is highly dependent on use case and it will not have an effect on the stock pickings themselves.

Creating Outbound Pickings
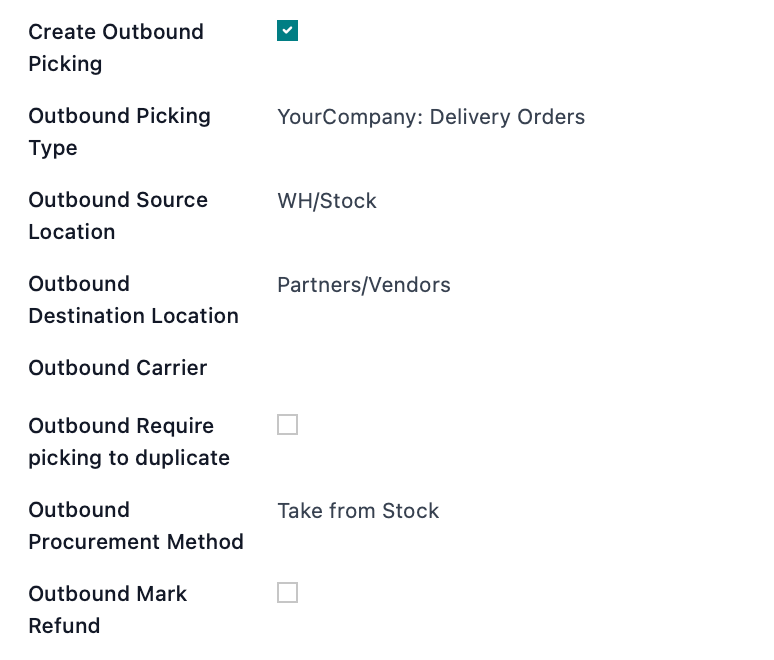
Create an outbound picking for shipping out replacement merchandise with the following configuration options:
Outbound Picking Type: This will typically be the Delivery Orders operation type for a given warehouse.
Outbound Source Location: The location the product is shipping from.
- For sale order RMAs, this will typically be a given warehouse's main Stock location.
Outbound Destination Location: The location the merchandise is shipping to.
- For Sale Order RMAs, this will typically be the 'Partner Locations/Customer' location.
- For Stock Picking RMAs:
If used to send replacement product to a customer, this will typically be the 'Partner Locations/Customer' location.
If used to send back damaged or otherwise unacceptable goods on a picking from a vendor, this will typically be the 'Partner Locations/Vendors' location.
Outbound Carrier: You can set a default carrier for outbound pickings. Please note: Odoo will automatically trigger the Pickings on an RMA once the RMA is confirmed. If your outbound picking needs to wait for any reason, you can leave this field blank or set it to hold and edit it post-confirmation.
Outbound Require Picking to Duplicate: When checked, this will find an eligible picking that can be duplicated. In a stock picking RMA, the eligible picking will be the picking that was selected from the drop-down menu. When unchecked, it will make a new picking.
Outbound Procurement Method: Select the procurement method for the outbound picking. 'Take from Stock' will take from stock, while 'Apply Procurements' will be based on your company's particular procurement configuration.
Outbound Mark Refund: This will increment or decrement quantities on the documents associated with the return. Note that this is highly dependent on use case and it will not have an effect on the stock pickings themselves.

Instructions
Internal Instructions: These instructions provide guidance to internal customer service agents on any steps they need to follow for the selected type of return.

Customer Instructions: These instructions can be used to inform customers how to proceed with their return. Additionally, these can be included in email templates.

Good to Know!
Return to Vendor Configuration
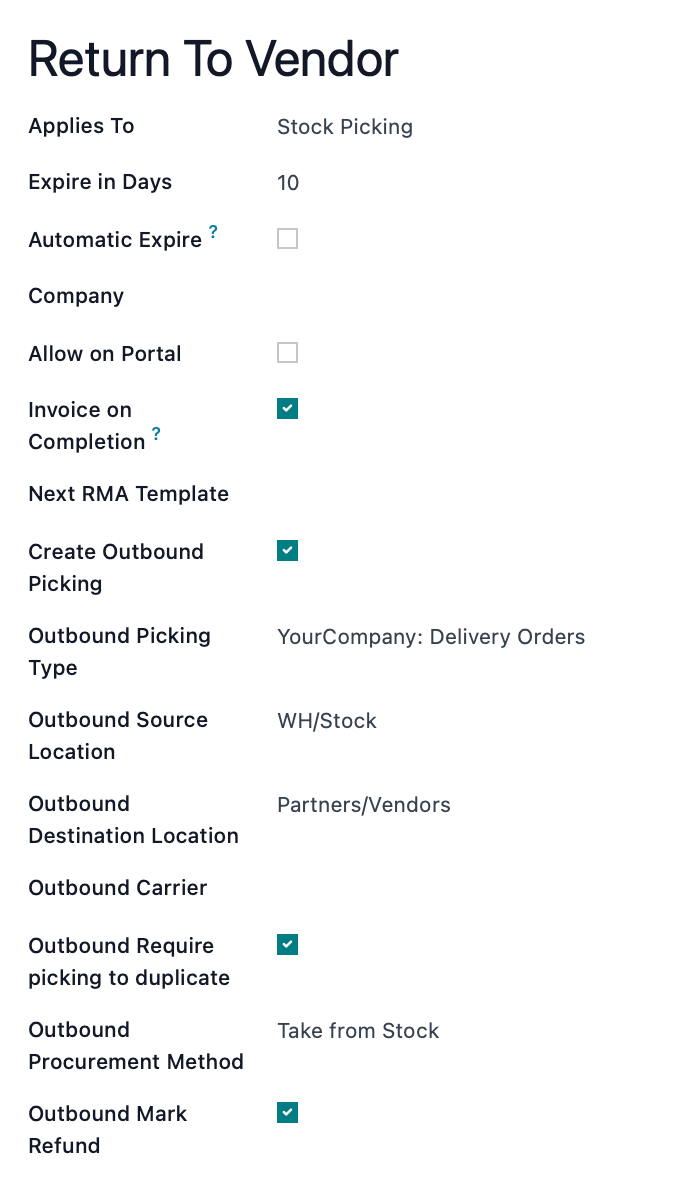
You may have a return scenario that requires you to return a product to the vendor, thereby decrementing the original ordered quantity on the Purchase Order and resulting in a credit for the returned product. To accomplish that type of RMA, you will need to use the following template configuration:

This configuration MUST include the following:
Applies To: set to Stock Picking
Invoice on Completion: Enabled
Create Outbound Picking: Enabled
Outbound Destination Location: Set to Partner Locations/Vendors or a similar partner/vendor location of your choosing.
Outbound Require picking to duplicate: Enabled
Outbound Mark Refund: Enabled