- Stock Delivery Planner
- ShipBox
- PrintBox
- Boxes
- US ZIP Code to City/State
- Point of Sale Modules
- Purchase by Sale History MRP
- Payroll Batch Work Entry Error SKIP
- Web Auto Paginate
- Website Modules
- Hibou Fedex Shipping
- Hibou Commissions
- Sale Section Subtotal
- Forte Payment Acquirer
- Helpdesk Modules
- Account Payment Electronic
- Tools + Settings Modules
- Sales Modules
- Inventory Modules
- Accounting Modules
- Manufacturing Modules
- Purchase Modules
- Project Modules
- Payment Analytic
- Payroll Modules
- Human Resources (HR) Modules
- HR Holidays Partial
- Payroll Input Name Report
- HR Payroll Input Report
- HR Holidays Accrual
- Maintenance Modules
- HR Employee Activity
Hibou Odoo Suite: Inventory Modules: Stamps.com (USPS) Shipping
Repository Versions:
Modules:
OPL-1
Purpose
This documentation outlines the use case and processes associated with Hibou's Stamps.com Shipping module for Odoo 12. This module allows you to send your shipments through Stamps.com and track them online.
Getting Started
First thing's first, we want to install the module! Navigate to the Apps application.

Once there, remove the 'Apps' filter, then search for the 'Stamps.com'. When you're ready, click Install.

Good to Know!
The Stamps.com Shipping module requires the Delivery Costs module. However, if you do not already have this module installed Odoo will install it for you during this module's installation.
Process
To get started, navigate to the Inventory app.

Creating a Delivery Method with Stamps.com
Once there select Configuration > Delivery > Delivery Methods. Here we will find a list of delivery methods. To make a new one, click Create.
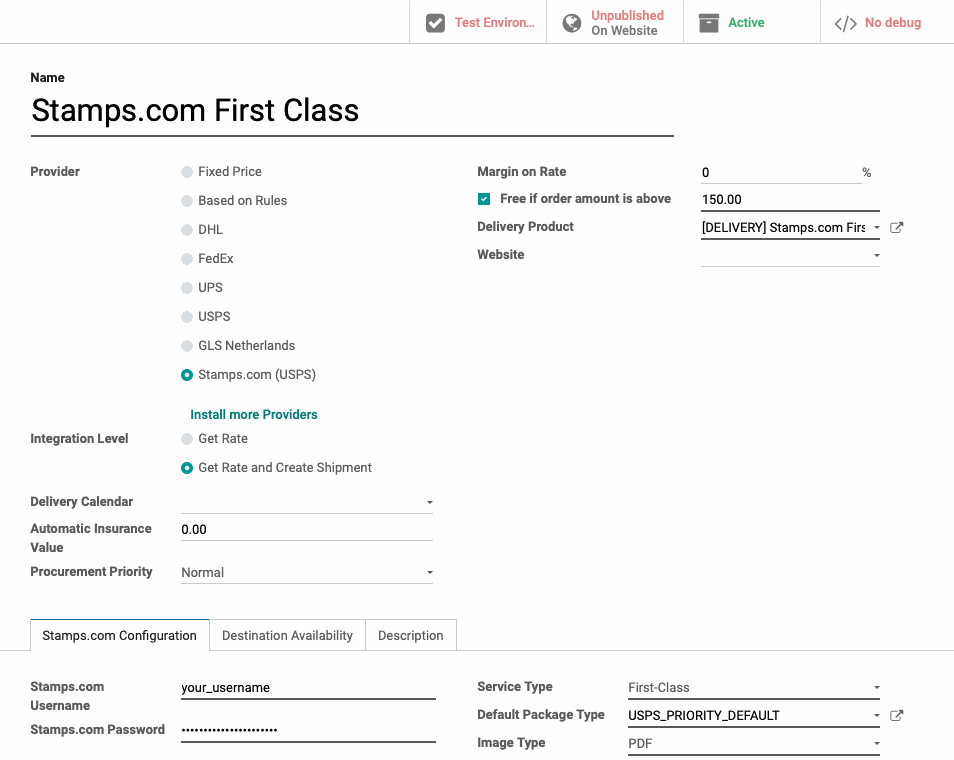
Enter a name for the Shipping Method and select 'Stamps.com (USPS) from the Provider selection. Once Stamps.com has been selected, a new Integration Level field will be added and the 'Pricing' tab will become a Stamps.com Configuration tab.
Integration Level:
'Get Rate: Use this' to just get the rate when the delivery order is validated.
'Get Rate and Create Shipment': Use this to get the rate and also send the shipping information to the shipper when the delivery order is validated.
Delivery Calendar: This calendar represents the days the carrier will deliver a package.
Automatic Insurance Value: To add a set insurance value automatically, enter that value here.
Procurement Priority: Enter the priority for this carrier. You selection will affect pickings and procurements related to this carrier.
Margin on Rate: This percentage will be added to the shipping price.
Free if order amount is above: Select this to enable free shipping over a specific amount. When checked, a new field will display where you'll enter the amount in your respective currency.
Delivery Product: Indicate which product should be associated with this carrier method.
Website: To use this method on one website only, select that site here.
Under the STAMPS.COM CONFIGURATION tab:
Stamps.com Username: Username of user logging in or for whom the web method is being called.
Stamps.com Password: Password of user.
Service Type: USPS Service Type (Priority or First Class)
Default Package Type: The type of package like Letter, Flat Rate or Package. Note that these will need to be created, as seen in the next section below.
Image Type: The file type of the image used in your label

When finished, hit the Save button.
Creating a Default Package Type
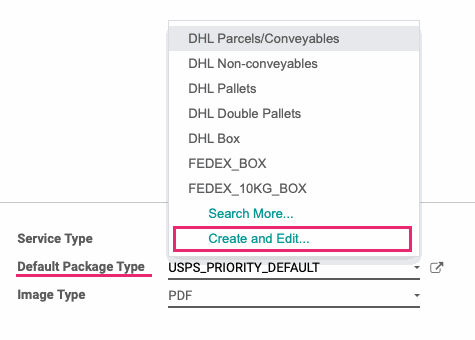
At the bottom of the Default Package Type dropdown select Create and Edit....

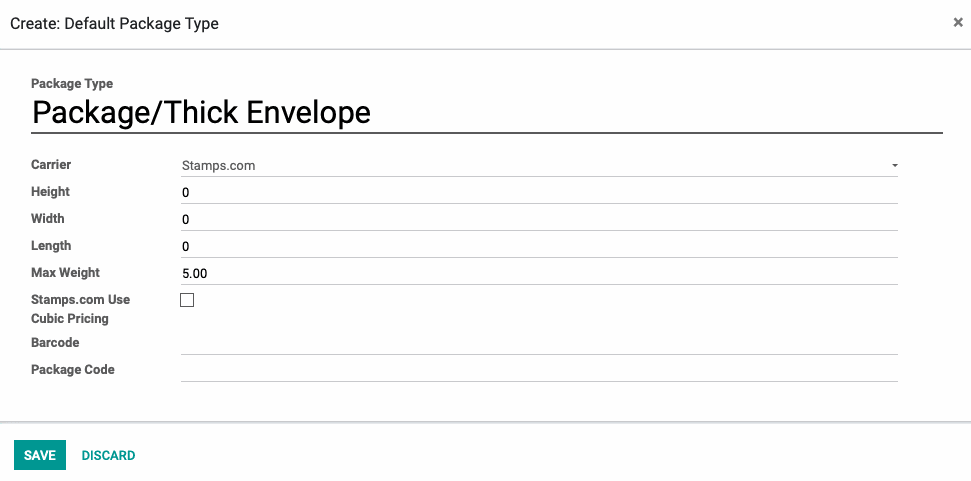
A form modal will pop up with various fields:
Package Type: The type of package like Letter, Package, etc.
Height: The height in inches and tenths of an inch
Width: The width in inches and tenths of an inch
Length: The length in inches and tenths of an inch
Max Weight: Maximum weight shippable in this packaging
Stamps.com Use Cubic Pricing: Enable to use cubic pricing, which is is a means for customers that ship in higher volumes to get more affordable rates on packages that are heavy but small.
Barcode: The barcode used for packaging identification
Package Code: Create a code for this package, if desired.

Technical
This module incorporates the Stamps.com API. The `product.packaging` model has two new additions: Stamps.com on the `package_carrier_type` selection field and a boolean field `stamps_cubic_pricing` that can be selected to use the Stamps.com cubic pricing.
The `delivery.carrier` model receives Stamps.com in the `delivery_type` selection field as well as the following new fields:
`stamps_integration_id` Char field for the Stamps.com Integration ID
`stamps_username` Char field for the Stamps.com username
`stamps_password` Char field for the Stamps.com password
`stamps_service_type` Selection field with 'First-Class' and 'Priority' options
`stamps_default_packaging_id` Many2one field for the Default Package Type
`stamps_image_type` Selection field to indicate the Image Type
The Delivery Carrier Form receives a new 'Stamps.com Configuration' tab which is only visible when Stamps.com is the chosen delivery type. It adds all of the new `delivery_carrier` fields listed above that are needed for the Stamps.com API integration.
The `stamps_cubic_pricing` field is added to the product packaging delivery form.