- Stock Delivery Planner
- ShipBox
- PrintBox
- Boxes
- US ZIP Code to City/State
- Point of Sale Modules
- Purchase by Sale History MRP
- Payroll Batch Work Entry Error SKIP
- Web Auto Paginate
- Website Modules
- Hibou Fedex Shipping
- Hibou Commissions
- Sale Section Subtotal
- Forte Payment Acquirer
- Helpdesk Modules
- Account Payment Electronic
- Tools + Settings Modules
- Sales Modules
- Inventory Modules
- Accounting Modules
- Manufacturing Modules
- Purchase Modules
- Project Modules
- Payment Analytic
- Payroll Modules
- Human Resources (HR) Modules
- HR Holidays Partial
- Payroll Input Name Report
- HR Payroll Input Report
- HR Holidays Accrual
- Maintenance Modules
- HR Employee Activity
Hibou Odoo Suite: Payroll Modules: Workers Compensation Class
Repository Versions:
Modules:
AGPL-3
AGPL-3
Purpose
The purpose of this documentation is to outline the use cases and processes associated with Hibou's Workers Compensation Class and Workers Compensation Class - Payroll modules.
The Workers Compensation Class module adds a new field to employee contracts to keep track of Workers' Comp. class codes and rates. Paired with Workers Compensation Class - Payroll, payslips can be linked with the contract's workers compensation codes. This is useful for reporting as well as grouping payslips. Additionally, salary rules can now make use of the Workers Comp code and rate.
Getting Started
First things first, we need to install the module! Navigate to the Apps Application and search 'Workers' Compensation Class'. When Ready, hit the Install button.

If you would like to link payslips with an employee contract's workers compensation code, also install the Workers' Compensation Class - Payroll module.

Processes
To get started, navigate to the Employees application.

Creating a Workers' Compensation Code
Once there select Configuration followed by Workers Comp. Codes. Then, hit the Create button.
Here you will find the form for creating a new Workers Compensation Code with the following fields:
Active: Keep check if you intend on using this code
Code: The code itself
Name: The name of the Code, for example Hospital: Processional
Rate: The rate for this code

Adding a Workers' Compensation Code to an Employee Contract
From the top menu of the Employees application select Contracts. Select an existing contract or make a new one by hitting the create button.
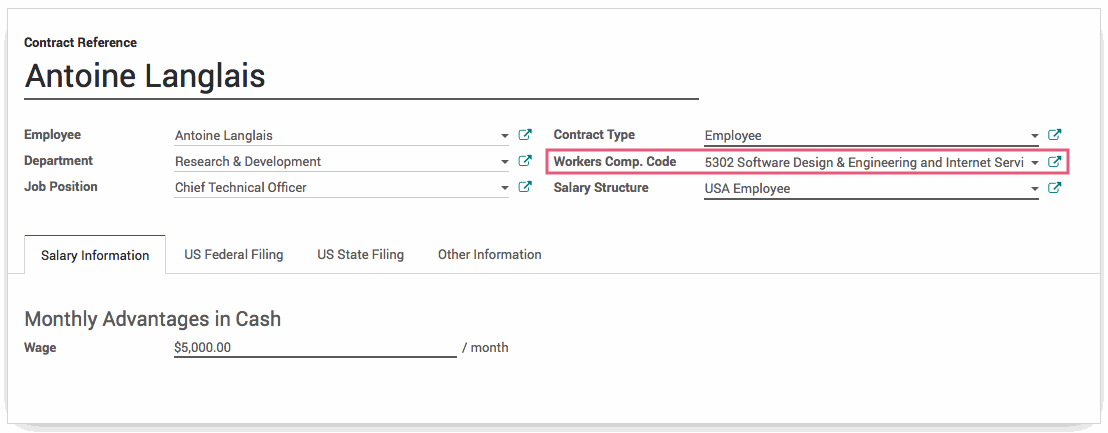
Underneath the Contract Type on the employee contract form you will find the new Workers Comp. Code field. Hit the edit button and select an existing code from the dropdown menu, or create one on the fly by selecting Create and Edit... from the bottom. When finished, hit the save button.

Workers Compensation Codes + Payslips
Once a Workers Compensation Code is added to an Employee's contract, it becomes available when creating employee payslips. Navigate to the Payroll application.

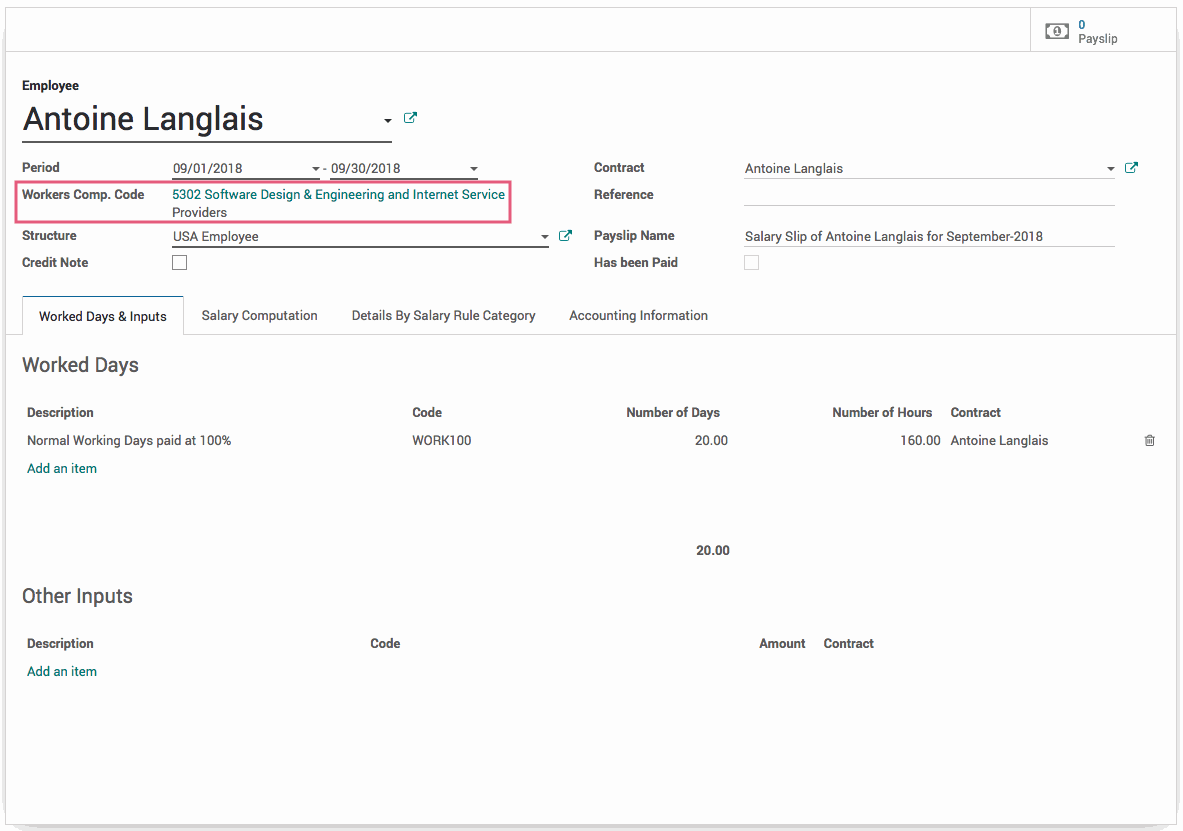
Once there hit the Create button to make a new payslip. Select an employee from the dropdown menu that has a Workers Comp. Code added to their employee contract. Once the employee has been selected, this field will be filled in.

Important!
The Workers Compensation Code must be set on the employee contract in order to be seen on Employee Payslip. If you select an employee from the dropdown menu on the Payslip form and the Workers Comp. Code does not appear, it is most likely not set on the Employee's contract.
Technical
The `hr_workers_comp` module adds a new model Workers Compensation Class with name, code and rate fields as well as a form view for this new model. Additionally, it adds a Many2one field for the workers compensation class code to the HR Contract model and adds it to the form view for contracts.
The `hr_workers_comp_payroll` module adds a Many2one field for the contracts workers compensation code to Payslips and adds this new field to the payslip form.